
A lovely old house
Many years ago, while I was working as a general building contractor, we purchased a grand old house on a large lot in downtown Mountain View. Two fine townhomes were built on the back of the lot and the original house in front remained.
Many renters enjoyed the house over the years, particularly its large living room with plenty of Craftsman period built-ins, the separate dining room, the 3 spacious bedrooms, the lovely sunroom with a view of the garden,

The sun room
and the good sized separate laundry room.
The single spacious bathroom and the original kitchen were, shall we say, original. Over time new flooring was put in, the bath area was tiled, and lots of painting and new wiring was added and life was good.
But the single sink for a 3 bedroom house and the kitchen with its 1960’s avocado green stove

and tenant improvised weird counters were the black sheep of the house. Plus, I had a longing to get down and dirty and back into the nitty gritty of the remodeling game I was so good at – drywall, concrete, electrical, plumbing, carpentry – all trades I was proficient in. I could still do it (I hoped) and it definitely needed doing. We had two weeks between tenants, my wife, Mary, who had always helped me on most everything and who was knowledgeable and skilled in many aspects of remodeling was available, so we began by checking out the local building supply stores to see what was available to use in our new bath and kitchen.

We decided the critical element in the bath was to provide a 2 bowl vanity and, in order to do this, we had to move the monster, the toilet (and with it the entire cast iron plumbing tree for the house). While we were at it we would keep the tub and recently added tile surround, but tear out most everything else including the old wall covering, heater, sink, toilet, linoleum floor and underlayment, heat ducting, and medicine cabinet.
The kitchen should be easier. Get rid of the old stove and replace it with a new gas range with a microwave overhead, a new cabinet over the microwave, and tear out the old countertop and replace it with a newly tiled countertop with new cabinet underneath.
The tenant moved out, the fixtures and cabinet were picked up from Lowes, and we were ready to tear out.
We started tearing out the bathroom, removing everything but the bath tub. Most went easily but the felt underlayment of the old linoleum clung to the wood floor and had to be scraped off. fearful that it might contain asbestos, we found the safest and fastest way to remove it was to saturate it with a spray bottle and then scrape it up while soggy (avoids any airborn asbestos particles and comes off easily).

Starting the tearout
The most difficult and nasty part of the job took place under the house – accessible by crawling in the 10 inch to 2 foot high dirt and dust covered crawl space 30 feet to the bathroom.
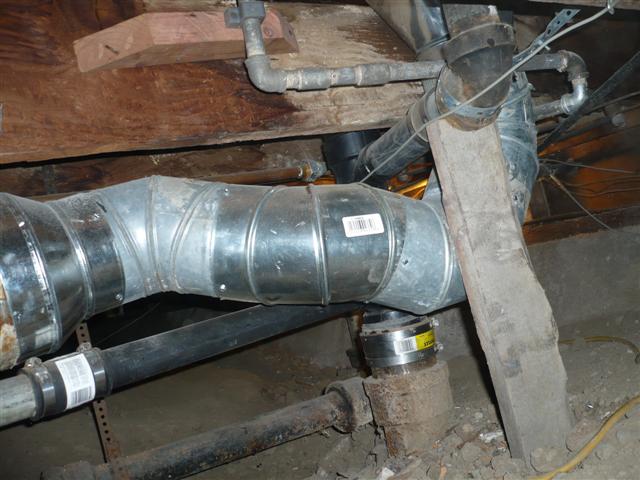
Lots going on in a small area
The first task was to remove the cast iron stack in a way that left a connection to the new ABS piping on top of it and to figure out how to fit all the connections (tub, sink, vent) in the 2 feet from the underside of the floor to the dirt. I had always used my Sawzall to cut the cast iron, using several metal cutting blades or a diamond blade, but using a 4 1/2″ hand grinder ($17 at harbor Freight) with a metal cut off wheel proved much faster but far dustier. After considerable planning the cast iron plumbing tree was removed.

Cast iron plumbing tree trophy!
After that, more than a dozen trips back under the house over several days resulted in getting the new stack installed, along with new air supply, water supply, vent and drain lines. Things got pretty tight in a small area
We were ready to move upstairs into the bathroom again. the old paneling was adhered to the wall with a black mastic that had to be scraped and smoothed.

Scraping off old mastic
Then it had to be covered with a couple of coats of mud (drywall compound) to prepare the surface.

Mudding the rough wall
After the walls were patched, smoothed, and sanded it was time for skip trowel texturing with the special blade and creamy mix of mud and a handful of 30 mesh sand.
to prepare the floor for tile we nailed down some cement 1/4″ backer board after leveling as best we could. 8
The backer board was also set in a thin layer of thinset mortar.

We came up with a pretty nice cut along the curve of the tub – sort of practice for cutting the large tiles to go on next.

Texturing wall defects
While Tim was crawling in the dust under the house and getting the bathroom ready for tile,

Not much room under here
Mary spent over a week going over each room in the house, cleaning the walls, filling all the cracks, texturing the patched areas, and making hundreds of step aerobic moves on the step stool.

Sanding taped and mudded joints
The cracked and peeling walls were looking bar and new. No job was too tough or nasty for her, including sanding the drywall joints and textured areas before priming and painting.

All that remained was cutting out the base for a tight vanity fit, , cutting and installing the bathroom tile,
and installing the vanity.8 Of course, someone had to come by and make Tim’s tile job look decent.

The tile expert

Better not leak
What does one do for two weeks after the toilet is removed?


Mary is a hard worker
By: timary on August 1, 2015
at 4:06 am